> ## Documentation Index
> Fetch the complete documentation index at: https://openops-ecb4f397-ops-3865.mintlify.site/llms.txt
> Use this file to discover all available pages before exploring further.
# Building Workflows
> How to use the OpenOps workflow editor to create new workflows
export const NarrowImage = ({src, alt, widthPercent}) => {
const className = `narrow-image-${useId().replace(/:/g, '-')}`;
const widthRule = widthPercent ? `width: ${widthPercent}%;` : '';
return <>
 ;
};
In many cases, you can apply optimizations by taking one of the pre-made [workflow templates](/workflow-management/workflow-templates), creating a workflow off of the template, and customizing it to your liking.
When there's no template to bootstrap from, you can create a new workflow from scratch.
To end up with a minimally usable workflow, you need to:
1. [Create a new workflow](#creating-a-new-workflow)
2. [Add a trigger](#adding-a-trigger)
3. [Add at least one action](#adding-actions)
4. [Test the workflow](#testing-a-workflow)
5. [Publish the workflow](#publishing-a-workflow)
Every workflow is made of steps. There are **two types of workflow steps**: triggers and actions.
* A **trigger** is your workflow's first step. It defines how often your workflow executes. It may also represent an event that needs to occur for your workflow to kick off. A workflow always has exactly one trigger.
* **Actions** are all subsequent steps of your workflow that start executing once your workflow is activated by a trigger.
Below is an example of a workflow that is triggered on a schedule. The first node represents the schedule trigger, and all other nodes are actions:
In another example, here's a workflow that uses an update of a Jira Cloud issue as a trigger:
## Creating a new workflow
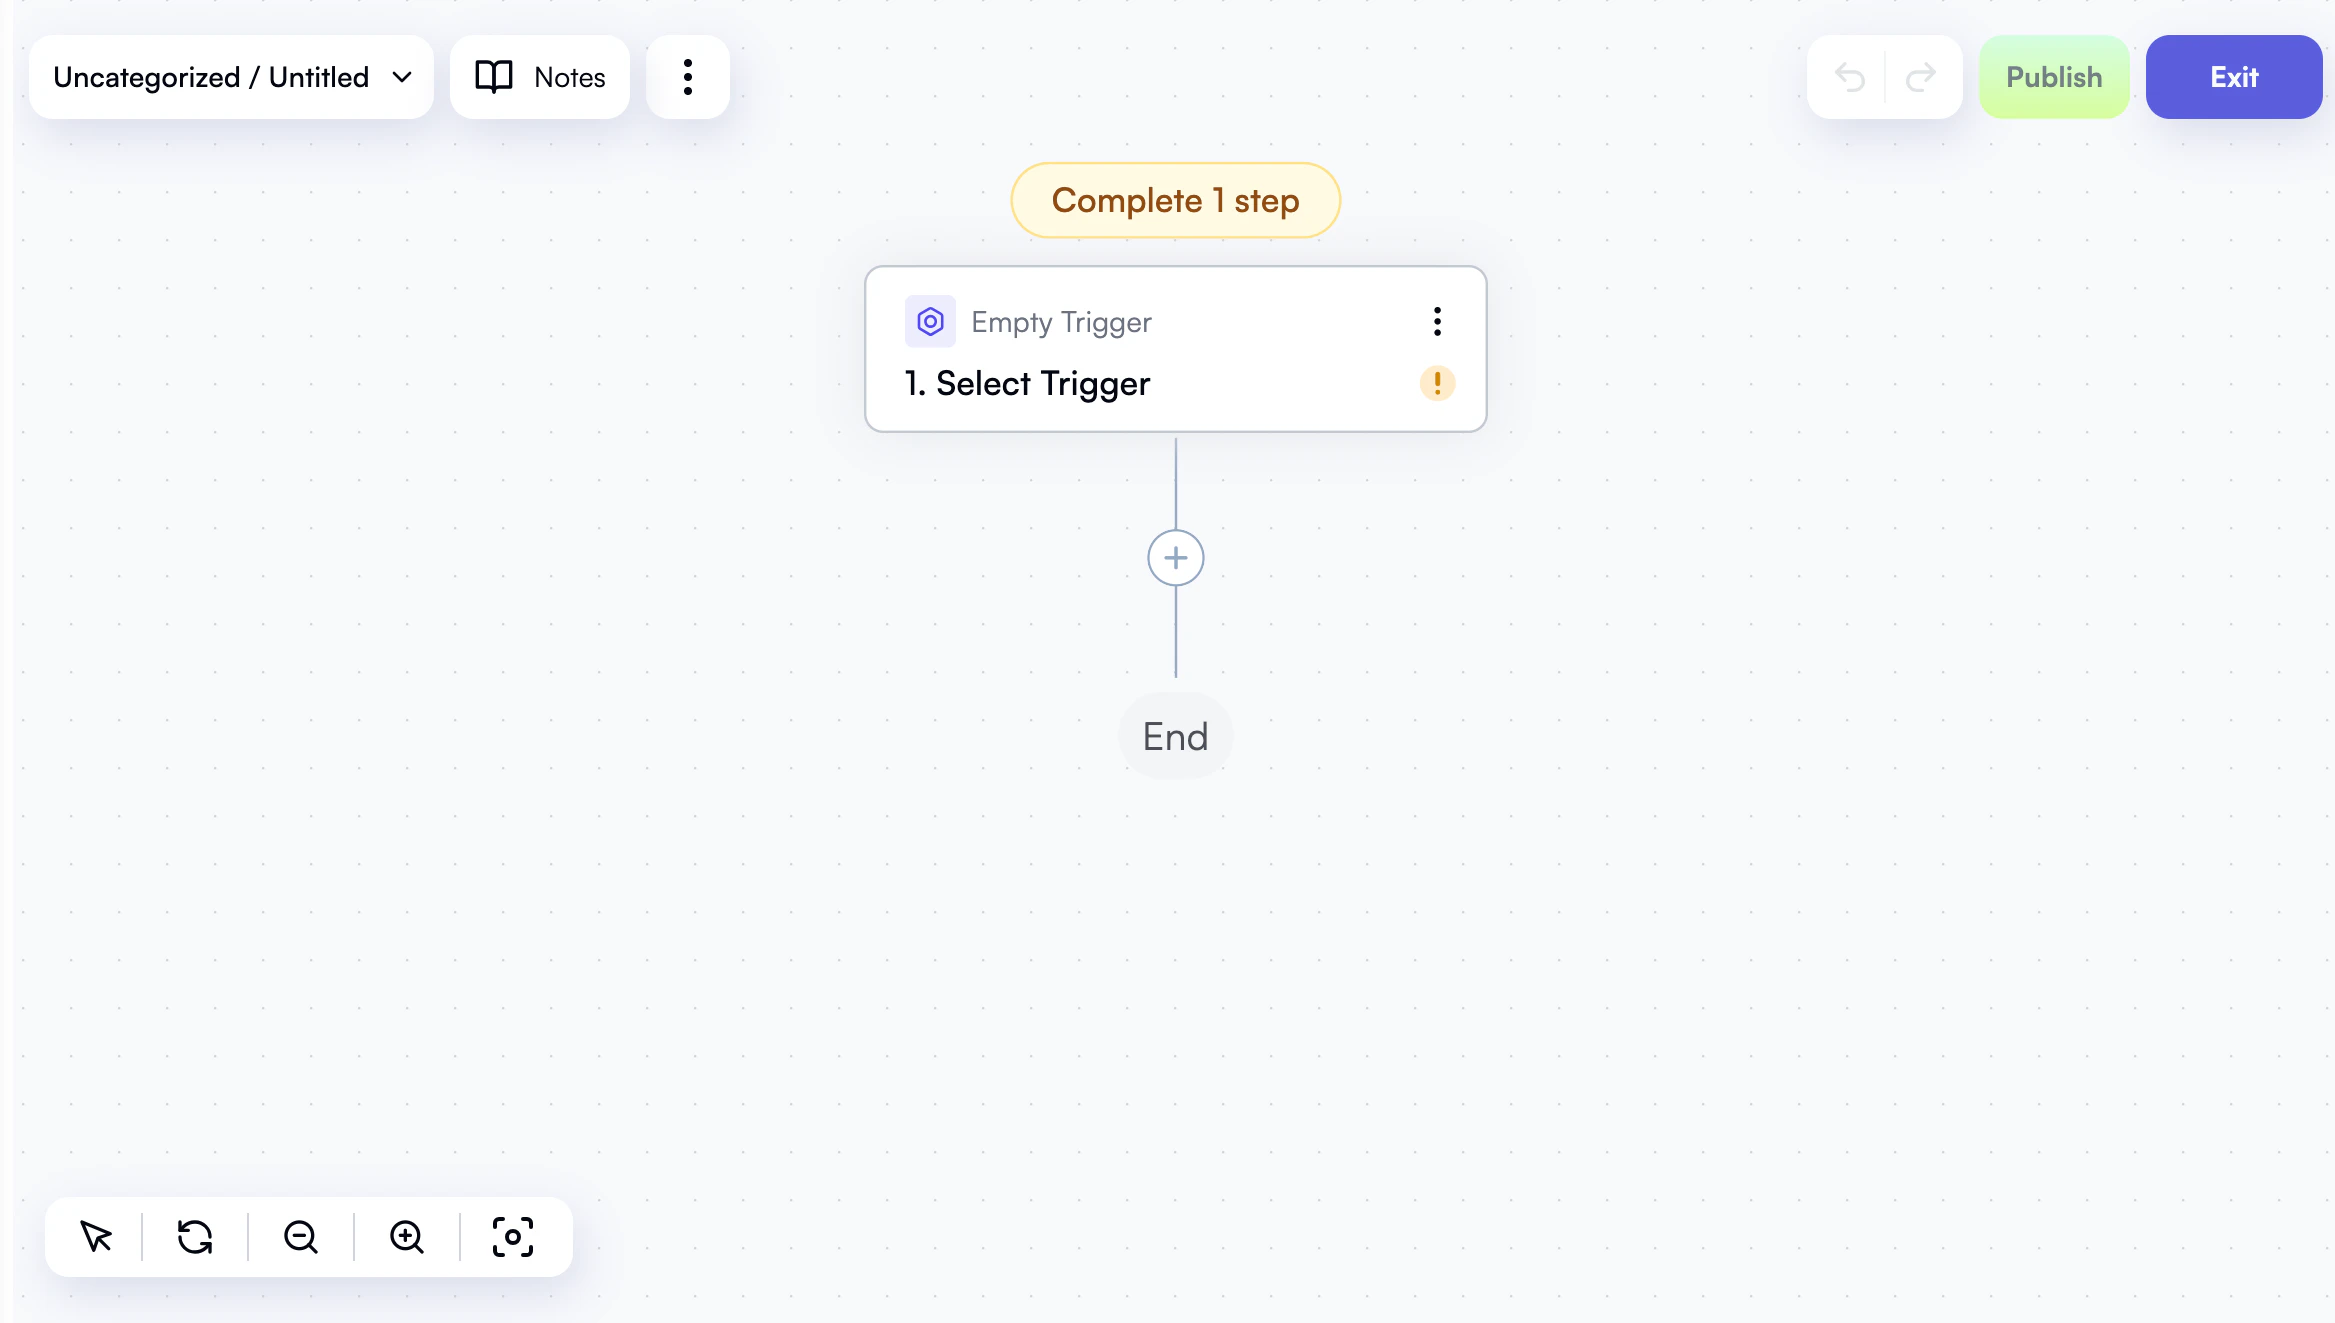
To create a new empty workflow, go to the **Workflows** section in your OpenOps instance, and click **New Workflow** in the top right corner. What you'll see is the workflow editor, which initially looks like this:
;
};
In many cases, you can apply optimizations by taking one of the pre-made [workflow templates](/workflow-management/workflow-templates), creating a workflow off of the template, and customizing it to your liking.
When there's no template to bootstrap from, you can create a new workflow from scratch.
To end up with a minimally usable workflow, you need to:
1. [Create a new workflow](#creating-a-new-workflow)
2. [Add a trigger](#adding-a-trigger)
3. [Add at least one action](#adding-actions)
4. [Test the workflow](#testing-a-workflow)
5. [Publish the workflow](#publishing-a-workflow)
Every workflow is made of steps. There are **two types of workflow steps**: triggers and actions.
* A **trigger** is your workflow's first step. It defines how often your workflow executes. It may also represent an event that needs to occur for your workflow to kick off. A workflow always has exactly one trigger.
* **Actions** are all subsequent steps of your workflow that start executing once your workflow is activated by a trigger.
Below is an example of a workflow that is triggered on a schedule. The first node represents the schedule trigger, and all other nodes are actions:
In another example, here's a workflow that uses an update of a Jira Cloud issue as a trigger:
## Creating a new workflow
To create a new empty workflow, go to the **Workflows** section in your OpenOps instance, and click **New Workflow** in the top right corner. What you'll see is the workflow editor, which initially looks like this:
 Let's look around and see what controls the editor provides:
* In the top left corner, if you click the arrow next to the workflow name, you'll see a menu that lets you rename or delete the workflow, move it to a folder for better organization, or perform [export and import](/workflow-management/import-export/) operations:
* To the right of the workflow name, use the **Notes** button if you want to describe the intent of your workflow in detail or leave any other comments for future reference.
* Click the three-dot menu icon to expose additional options: **Tree view**, **Version history**, and **Run logs**.
Version history and run logs become more relevant when you update or [troubleshoot](/workflow-management/investigate-workflow-run) your workflows later. You can also click **Tree view** to display a side panel showing the compact structure of your workflow, including its trigger, all actions, and any [conditions and branches](/workflow-management/conditional-branching):
## Adding a trigger
When you create a new workflow, the editor creates an empty stub trigger. When you click the trigger node, you can see a list of trigger blocks — groups of related triggers. Select a block that works for you:
After selecting a block, choose a specific trigger within that block:
OpenOps provides over 10 triggers divided into several blocks:
* **Schedule**: *Every X minutes*, *Every hour*, *Every day*, *Every week*, *Every month*, *Cron expression*.
* **Jira Cloud**: *New issue*, *Updated issue*.
* **Linear**: *New issue*, *Updated issue*, *Removed issue*.
* **IMAP**: *New email*.
* **Microsoft Outlook**: *New email*.
* **Webhook**: *Catch webhook*.
Some triggers are used more often than others. For most of your scenarios, you will probably use one of the triggers in the **Schedule** block, setting your workflows to run at a predetermined interval. For details on schedule triggers, see [Scheduling](/workflow-management/scheduling/).
If you use the **Webhook** trigger, note that it supports both asynchronous and synchronous calls:
* Use the live URL shown in the trigger properties to start the workflow asynchronously.
* If the webhook caller expects a response, add `/sync` to the end of the live URL. The request waits for the workflow to complete.
* To return a response body and headers from your workflow, add an **HTTP** step with the **Send Webhook Response** action.
After selecting a trigger, click the trigger node again to display a right-hand pane with the properties of the trigger. For example, here are the properties of the *Every day* trigger:
Let's look around and see what controls the editor provides:
* In the top left corner, if you click the arrow next to the workflow name, you'll see a menu that lets you rename or delete the workflow, move it to a folder for better organization, or perform [export and import](/workflow-management/import-export/) operations:
* To the right of the workflow name, use the **Notes** button if you want to describe the intent of your workflow in detail or leave any other comments for future reference.
* Click the three-dot menu icon to expose additional options: **Tree view**, **Version history**, and **Run logs**.
Version history and run logs become more relevant when you update or [troubleshoot](/workflow-management/investigate-workflow-run) your workflows later. You can also click **Tree view** to display a side panel showing the compact structure of your workflow, including its trigger, all actions, and any [conditions and branches](/workflow-management/conditional-branching):
## Adding a trigger
When you create a new workflow, the editor creates an empty stub trigger. When you click the trigger node, you can see a list of trigger blocks — groups of related triggers. Select a block that works for you:
After selecting a block, choose a specific trigger within that block:
OpenOps provides over 10 triggers divided into several blocks:
* **Schedule**: *Every X minutes*, *Every hour*, *Every day*, *Every week*, *Every month*, *Cron expression*.
* **Jira Cloud**: *New issue*, *Updated issue*.
* **Linear**: *New issue*, *Updated issue*, *Removed issue*.
* **IMAP**: *New email*.
* **Microsoft Outlook**: *New email*.
* **Webhook**: *Catch webhook*.
Some triggers are used more often than others. For most of your scenarios, you will probably use one of the triggers in the **Schedule** block, setting your workflows to run at a predetermined interval. For details on schedule triggers, see [Scheduling](/workflow-management/scheduling/).
If you use the **Webhook** trigger, note that it supports both asynchronous and synchronous calls:
* Use the live URL shown in the trigger properties to start the workflow asynchronously.
* If the webhook caller expects a response, add `/sync` to the end of the live URL. The request waits for the workflow to complete.
* To return a response body and headers from your workflow, add an **HTTP** step with the **Send Webhook Response** action.
After selecting a trigger, click the trigger node again to display a right-hand pane with the properties of the trigger. For example, here are the properties of the *Every day* trigger:
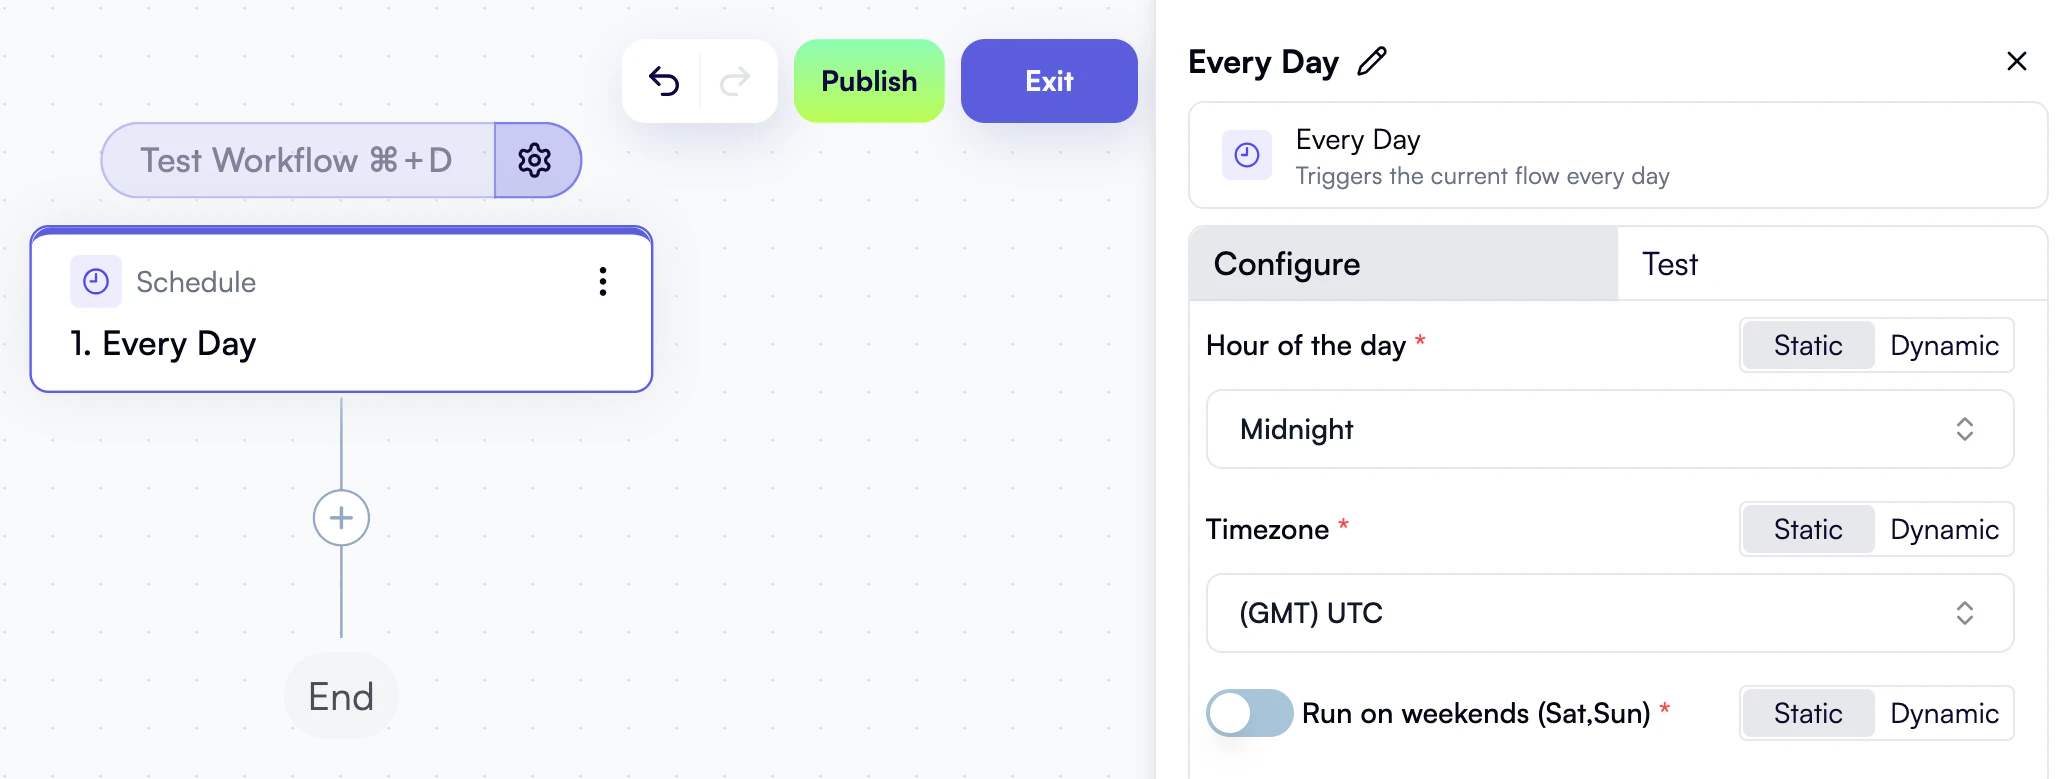 You can choose a specific hour in a specific time zone and include weekends, or go with the reasonable defaults.
Properties will vary with each type of trigger. For example, if the trigger is a new issue in Jira Cloud, you can specify a search query using Jira's JQL query language.
## Adding actions
As soon as you've created a trigger, the next and all subsequent steps of your workflow will be actions.
### Adding the first action
Click the **+** icon under the trigger, and a pop-up menu will display a list of available action blocks. Clicking a block lets you select a specific action:
OpenOps provides a total of [120+ actions](/workflow-management/actions/). One way to make sense of them is to classify them by intent:
* To **get data** for your workflow to process, look at cloud provider integration actions like **AWS**, **Azure** or **Google Cloud**, recommendation provider actions such as **Umbrella**, **Archera** and **AWS Compute Optimizer**, or generic **HTTP** actions.
* To **control the execution of your workflow**, use actions grouped under **Condition** and **Split**, **Loop on items**, **Delay**, and **Stop Execution**.
* To **process data obtained in previous steps**, use **Date, List, Math, and Text operations**, **Data mapper** for advanced transformations, **AI Step** for applying LLM prompts to step outputs, and **Code** for transformations that you can't express with available no-code actions.
* To **request human intervention**, use **Approval** or **Slack**.
* To **make or request changes to cloud resources**, use cloud provider actions, IaC integration actions like **AWS CloudFormation** and **Terraform**, and the **GitHub** action.
* To **make updates in project management tools**, use **Jira Cloud**, **Linear**, **Zendesk**, or **Monday.com** actions.
* To **save data and generate reports**, use **SMTP**, **SFTP**, **Storage**, and **OpenOps Tables** actions.
When you select an action, OpenOps adds it to the workflow graph and displays a right-hand pane with the properties of the action:
You can choose a specific hour in a specific time zone and include weekends, or go with the reasonable defaults.
Properties will vary with each type of trigger. For example, if the trigger is a new issue in Jira Cloud, you can specify a search query using Jira's JQL query language.
## Adding actions
As soon as you've created a trigger, the next and all subsequent steps of your workflow will be actions.
### Adding the first action
Click the **+** icon under the trigger, and a pop-up menu will display a list of available action blocks. Clicking a block lets you select a specific action:
OpenOps provides a total of [120+ actions](/workflow-management/actions/). One way to make sense of them is to classify them by intent:
* To **get data** for your workflow to process, look at cloud provider integration actions like **AWS**, **Azure** or **Google Cloud**, recommendation provider actions such as **Umbrella**, **Archera** and **AWS Compute Optimizer**, or generic **HTTP** actions.
* To **control the execution of your workflow**, use actions grouped under **Condition** and **Split**, **Loop on items**, **Delay**, and **Stop Execution**.
* To **process data obtained in previous steps**, use **Date, List, Math, and Text operations**, **Data mapper** for advanced transformations, **AI Step** for applying LLM prompts to step outputs, and **Code** for transformations that you can't express with available no-code actions.
* To **request human intervention**, use **Approval** or **Slack**.
* To **make or request changes to cloud resources**, use cloud provider actions, IaC integration actions like **AWS CloudFormation** and **Terraform**, and the **GitHub** action.
* To **make updates in project management tools**, use **Jira Cloud**, **Linear**, **Zendesk**, or **Monday.com** actions.
* To **save data and generate reports**, use **SMTP**, **SFTP**, **Storage**, and **OpenOps Tables** actions.
When you select an action, OpenOps adds it to the workflow graph and displays a right-hand pane with the properties of the action:
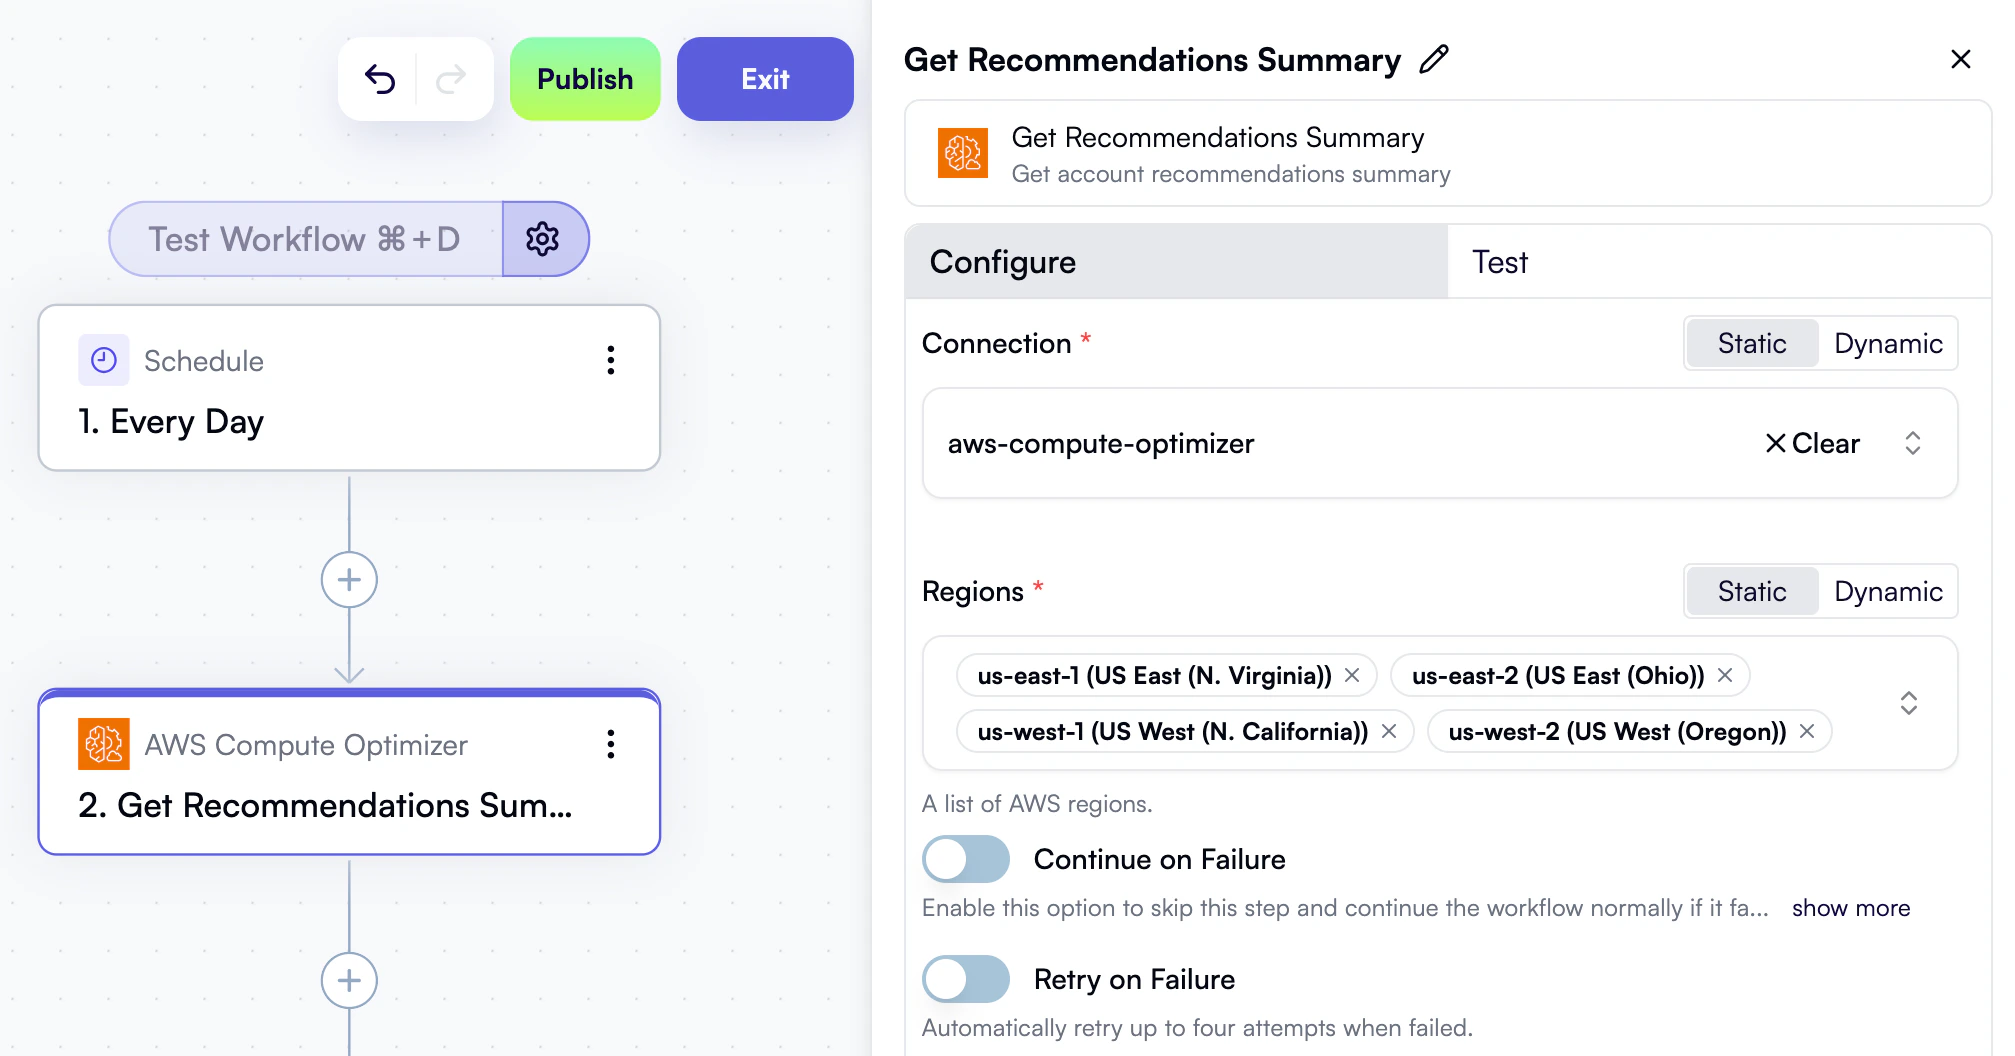 The specific set of properties depends on the type of action. Here are a few general rules:
* Actions that get data from or send data to external resources will require you to [define a **connection**](/cloud-access/access-levels-permissions). For example, for AWS-related actions, you'd need to specify your access key ID, secret access key, and the default region. For a Slack connection, you'd specify your Slack instance's redirect URL, your client ID, and your client secret. One connection can be reused across multiple actions, and the OpenOps UI provides a separate view to list all connections you have defined so far.
* Actions that process data obtained in previous steps will ask you to specify the input data. For details, see [Passing Data Between Workflow Steps](/workflow-management/passing-data).
* You can get [AI assistance](/ai-assistance/overview/) in many actions that involve writing CLI commands (AWS CLI, Azure CLI, Google Cloud CLI), SQL queries (AWS Athena, Snowflake, Databricks, BigQuery), or custom code. To enable AI assistance, you'll need to [connect OpenOps to an LLM provider](/ai-assistance/llm-connections) of your choice. OpenAI, Anthropic, Perplexity, and a dozen other LLM providers are supported.
* Every action has two toggles: **Continue on Failure**, which lets the current action fail and continues the workflow regardless, and **Retry on Failure**, which retries the current action up to four times before giving up.
### Adding more actions
You can add more actions by clicking the **+** icon in the workflow graph. You don't need to add actions sequentially: the **+** button is available between existing actions, allowing you to add new actions in the middle of your workflow.
#### Copying and pasting steps
If you need to reuse an action step in multiple places, you can **copy/paste** it. This copies the action along with all its property values, saving you the trouble of reconfiguring it. For example, you can copy/paste actions between different workflows, or between [conditional branches](/workflow-management/conditional-branching/) of the same workflow that often end up sharing a part of their containing actions.
There are three ways to use copy/paste actions:
1. With the standard copy/paste keyboard shortcuts (**Ctrl+C/V** or **Cmd+C/V** on Mac). When you paste this way, the copied action is inserted after the action that is currently selected in the workflow graph.
2. Using the right-click context menu of any action:
3. By clicking the three-dot menu of any action:
There are several ways to paste the copied action:
* Select an action after which you want to insert the copied action, then right-click and choose **Paste after**.
* Right-click the **+** icon between two existing actions and click **Paste here**:
* Right-click a loop action and select **Paste inside loop**. This inserts the copied action as the first action inside the loop:
* To paste as the first action after a loop or condition, right-click anywhere inside the loop or condition and click **Paste after selection**.
* To paste as the last action in the workflow, right-click anywhere outside the workflow graph and click **Paste after selection**.
Note that copy/paste has variable availability depending on the protocol used to access OpenOps:
* HTTPS installations, and HTTP on localhost: keyboard shortcuts, context menu, and three-dot menu are all available.
* Non-localhost HTTP installations:
* Keyboard shortcuts are available for copying and pasting.
* Three-dot menu and right-click context menu are available, but only for copying. Use the keyboard shortcut for pasting.
* After copying via the context or three-dot menu, you can only paste within the same workflow.
#### Collapsing and expanding steps
As you add more actions to your workflow, you'll notice that the workflow graph becomes more cluttered and harder to navigate. This is even more evident when your workflow includes many loops and conditions.
To make it easier to navigate complex workflows, you can collapse steps representing loops, [conditions](/workflow-management/conditional-branching#condition), and [split](/workflow-management/conditional-branching#split) actions.
For example, in the following image, step 7 is a condition with a branch that contains another condition:
The specific set of properties depends on the type of action. Here are a few general rules:
* Actions that get data from or send data to external resources will require you to [define a **connection**](/cloud-access/access-levels-permissions). For example, for AWS-related actions, you'd need to specify your access key ID, secret access key, and the default region. For a Slack connection, you'd specify your Slack instance's redirect URL, your client ID, and your client secret. One connection can be reused across multiple actions, and the OpenOps UI provides a separate view to list all connections you have defined so far.
* Actions that process data obtained in previous steps will ask you to specify the input data. For details, see [Passing Data Between Workflow Steps](/workflow-management/passing-data).
* You can get [AI assistance](/ai-assistance/overview/) in many actions that involve writing CLI commands (AWS CLI, Azure CLI, Google Cloud CLI), SQL queries (AWS Athena, Snowflake, Databricks, BigQuery), or custom code. To enable AI assistance, you'll need to [connect OpenOps to an LLM provider](/ai-assistance/llm-connections) of your choice. OpenAI, Anthropic, Perplexity, and a dozen other LLM providers are supported.
* Every action has two toggles: **Continue on Failure**, which lets the current action fail and continues the workflow regardless, and **Retry on Failure**, which retries the current action up to four times before giving up.
### Adding more actions
You can add more actions by clicking the **+** icon in the workflow graph. You don't need to add actions sequentially: the **+** button is available between existing actions, allowing you to add new actions in the middle of your workflow.
#### Copying and pasting steps
If you need to reuse an action step in multiple places, you can **copy/paste** it. This copies the action along with all its property values, saving you the trouble of reconfiguring it. For example, you can copy/paste actions between different workflows, or between [conditional branches](/workflow-management/conditional-branching/) of the same workflow that often end up sharing a part of their containing actions.
There are three ways to use copy/paste actions:
1. With the standard copy/paste keyboard shortcuts (**Ctrl+C/V** or **Cmd+C/V** on Mac). When you paste this way, the copied action is inserted after the action that is currently selected in the workflow graph.
2. Using the right-click context menu of any action:
3. By clicking the three-dot menu of any action:
There are several ways to paste the copied action:
* Select an action after which you want to insert the copied action, then right-click and choose **Paste after**.
* Right-click the **+** icon between two existing actions and click **Paste here**:
* Right-click a loop action and select **Paste inside loop**. This inserts the copied action as the first action inside the loop:
* To paste as the first action after a loop or condition, right-click anywhere inside the loop or condition and click **Paste after selection**.
* To paste as the last action in the workflow, right-click anywhere outside the workflow graph and click **Paste after selection**.
Note that copy/paste has variable availability depending on the protocol used to access OpenOps:
* HTTPS installations, and HTTP on localhost: keyboard shortcuts, context menu, and three-dot menu are all available.
* Non-localhost HTTP installations:
* Keyboard shortcuts are available for copying and pasting.
* Three-dot menu and right-click context menu are available, but only for copying. Use the keyboard shortcut for pasting.
* After copying via the context or three-dot menu, you can only paste within the same workflow.
#### Collapsing and expanding steps
As you add more actions to your workflow, you'll notice that the workflow graph becomes more cluttered and harder to navigate. This is even more evident when your workflow includes many loops and conditions.
To make it easier to navigate complex workflows, you can collapse steps representing loops, [conditions](/workflow-management/conditional-branching#condition), and [split](/workflow-management/conditional-branching#split) actions.
For example, in the following image, step 7 is a condition with a branch that contains another condition:
 If you're not currently working on this part of the workflow, you can collapse it by clicking the collapse icon to the left of step 7:
Click the icon again to expand the condition the next time you need to work on it.
## Testing a workflow
As you build your workflow, you should test individual steps (both the trigger and all actions) in isolation. Once you're done editing and testing the steps, you should also [test the entire workflow](#testing-the-entire-workflow) to make sure that everything works as expected.
### Testing individual steps
In the properties pane for every step, there are two tabs: **Configure** and **Test**. When you click the **Test** tab, it displays two sections: **Step output** and **Sample output data**.
Under **Step output**, you can click **Test Step** to test or retest the step in isolation. "Testing" in this context means running the step's action against a live system that it is configured to connect to.
Sometimes, the **Test Step** button may be grayed out, like this:
Your step will also have a yellow warning icon next to it. If this happens, make sure you have filled in every mandatory input field in the step's properties pane. You may need to scroll through the properties pane to see all required fields.
Once you've filled in all mandatory fields, the **Test Step** button becomes active. Click it to run the test and view the output generated by the step:
If you don't have a connection defined when working on a step, or if you want to avoid running the step against a live system for any other reason, open the **Sample output data** tab. Once there, paste the expected output of the step. Depending on what the step's action does, this could be the result of a math operation, a JSON response from an API call, or similar.
Finally, click **Apply**:
This lets you avoid running the step against a live system while still being able to provide input data for subsequent steps in your workflow.
All steps that use sample output data have a corresponding label in the workflow graph:
### Testing the entire workflow
As soon as you have implemented and tested all steps, including a trigger and actions, it's time to test your entire workflow. If all the steps in your workflow are complete, you'll see the **Test Workflow** button at the top of the workflow editor, right above the trigger node:
If some of the steps aren't complete, you'll see the **Complete *n* steps** button at the top of the workflow editor instead. Incomplete steps will also be marked with a yellow warning icon:
Click **Complete *n* steps** to navigate to the first incomplete step in your workflow. Locate the remaining incomplete steps by the yellow warning icons next to them.
Once you've confirmed that all individual steps are complete, the **Test Workflow** button at the top of the workflow editor becomes active.
Before clicking the button, there's one more consideration. "Testing" the workflow in OpenOps means running all actions in the workflow against their respective live systems. If your workflow contains loops, and actions within those loops update live systems, you may want to set execution limits for each of these actions. To do this, click the **Settings** icon to the right of the **Test Workflow** button. This opens the **Set Action Limits** dialog:
If you're not currently working on this part of the workflow, you can collapse it by clicking the collapse icon to the left of step 7:
Click the icon again to expand the condition the next time you need to work on it.
## Testing a workflow
As you build your workflow, you should test individual steps (both the trigger and all actions) in isolation. Once you're done editing and testing the steps, you should also [test the entire workflow](#testing-the-entire-workflow) to make sure that everything works as expected.
### Testing individual steps
In the properties pane for every step, there are two tabs: **Configure** and **Test**. When you click the **Test** tab, it displays two sections: **Step output** and **Sample output data**.
Under **Step output**, you can click **Test Step** to test or retest the step in isolation. "Testing" in this context means running the step's action against a live system that it is configured to connect to.
Sometimes, the **Test Step** button may be grayed out, like this:
Your step will also have a yellow warning icon next to it. If this happens, make sure you have filled in every mandatory input field in the step's properties pane. You may need to scroll through the properties pane to see all required fields.
Once you've filled in all mandatory fields, the **Test Step** button becomes active. Click it to run the test and view the output generated by the step:
If you don't have a connection defined when working on a step, or if you want to avoid running the step against a live system for any other reason, open the **Sample output data** tab. Once there, paste the expected output of the step. Depending on what the step's action does, this could be the result of a math operation, a JSON response from an API call, or similar.
Finally, click **Apply**:
This lets you avoid running the step against a live system while still being able to provide input data for subsequent steps in your workflow.
All steps that use sample output data have a corresponding label in the workflow graph:
### Testing the entire workflow
As soon as you have implemented and tested all steps, including a trigger and actions, it's time to test your entire workflow. If all the steps in your workflow are complete, you'll see the **Test Workflow** button at the top of the workflow editor, right above the trigger node:
If some of the steps aren't complete, you'll see the **Complete *n* steps** button at the top of the workflow editor instead. Incomplete steps will also be marked with a yellow warning icon:
Click **Complete *n* steps** to navigate to the first incomplete step in your workflow. Locate the remaining incomplete steps by the yellow warning icons next to them.
Once you've confirmed that all individual steps are complete, the **Test Workflow** button at the top of the workflow editor becomes active.
Before clicking the button, there's one more consideration. "Testing" the workflow in OpenOps means running all actions in the workflow against their respective live systems. If your workflow contains loops, and actions within those loops update live systems, you may want to set execution limits for each of these actions. To do this, click the **Settings** icon to the right of the **Test Workflow** button. This opens the **Set Action Limits** dialog:
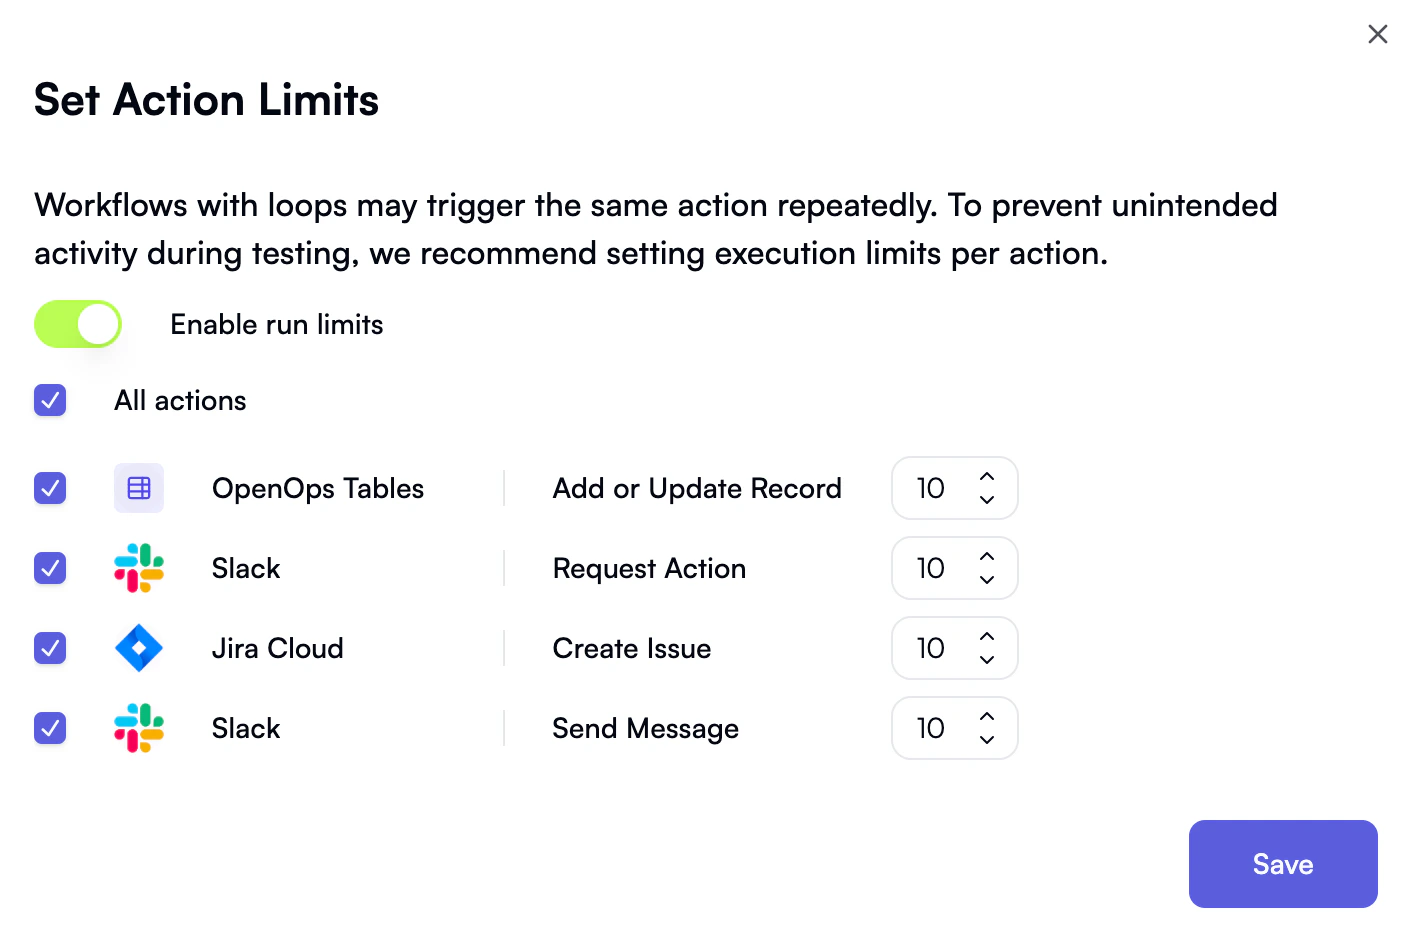 In the **Set Action Limits** dialog, OpenOps lists all write actions found inside loops in your workflow. For each action, you can set the maximum number of times it can be executed during workflow testing, or keep the default value of 10.
After setting and saving the execution limits, click **Test Workflow** to start testing.
Note that when you test the entire workflow, OpenOps will ignore any sample output data you may have provided for individual actions. Instead, it will run all actions in the workflow against their respective live systems.
After performing a test run of the workflow, OpenOps will show the results of the run in the **Run Details** pane to the left of the editor, indicating the status of each step, as well as its inputs and outputs:
## Publishing a workflow
When you're happy with your workflow and want to start running it, click **Publish** in the top right corner.
This also applies when you're editing an existing workflow: to avoid disrupting pending workflow runs, your changes won't take effect until you publish them.
In the **Set Action Limits** dialog, OpenOps lists all write actions found inside loops in your workflow. For each action, you can set the maximum number of times it can be executed during workflow testing, or keep the default value of 10.
After setting and saving the execution limits, click **Test Workflow** to start testing.
Note that when you test the entire workflow, OpenOps will ignore any sample output data you may have provided for individual actions. Instead, it will run all actions in the workflow against their respective live systems.
After performing a test run of the workflow, OpenOps will show the results of the run in the **Run Details** pane to the left of the editor, indicating the status of each step, as well as its inputs and outputs:
## Publishing a workflow
When you're happy with your workflow and want to start running it, click **Publish** in the top right corner.
This also applies when you're editing an existing workflow: to avoid disrupting pending workflow runs, your changes won't take effect until you publish them.